
Key Takeaways
- The rook cuts the board into two halves and the enemy king is confined to one of them. Every move should make his half smaller.
- A rook cannot shrink the box alone. Your king does the squeezing while the rook holds the line.
- The mate needs the opposition: your king directly facing his, one square apart, before the rook checks.
- When you can't make progress, play a waiting move with the rook along its line and force the enemy king to commit.
If you only learn one basic checkmate properly, make it this one. Not because it comes up most often, since the queen mate does, but because the rook mate is the one that actually teaches you something. The queen is strong enough to bully a king around on her own. A rook isn't, so this endgame forces you to learn how to use your king as a weapon.
That skill transfers directly into pawn endgames, where it decides far more games than any mating technique ever will.
How does the rook and king checkmate work?
Four steps:
- Cut the king off with the rook, splitting the board into two parts.
- Shrink his half by advancing your own king, one rank or file at a time.
- Take the opposition, your king directly facing his, one square between them.
- Check along the edge with the rook. Mate.
The rook's role is almost entirely defensive. It draws a line and holds it. Your king does the actual work of squeezing.
What does "cutting off the king" mean?
The rook divides the board. Everything on one side of its rank or file is off-limits to the enemy king, because stepping across the line would mean moving into check.
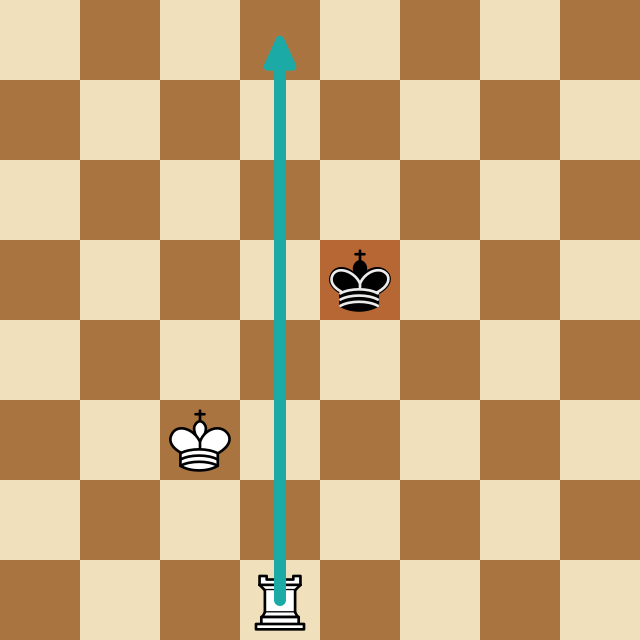
The black king here has files e through h. He cannot reach the d-file or anything left of it. That's a box, and it's your job to make it smaller, never larger.
The most common beginner error is giving pointless checks. A check pushes the king somewhere, but it usually doesn't shrink his territory, and it often loses the cutting line you'd already established. Before you check, ask whether the check makes his box smaller. If not, don't play it.
The right instinct is the opposite: improve your king. With the rook holding the line, walk your king toward the enemy. Every square it advances is a square the defender eventually loses.
Why you need the opposition
Because a rook alone cannot mate, and the opposition is how your king supplies the missing coverage.
The opposition means standing your king directly opposite his, with exactly one square between them. It's a zugzwang device: he can't move toward you, he can't stay where he is, so he must step sideways, into the position you want.
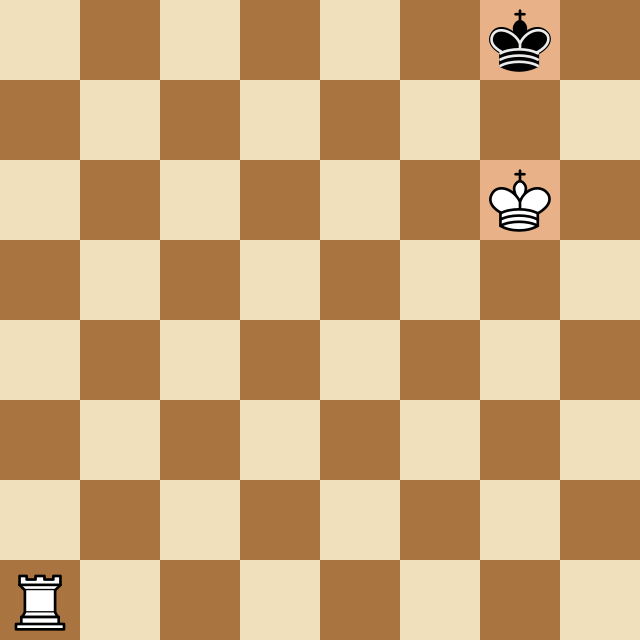
Black's king on g8 has only f8 and h8. Both are on the back rank. The white king on g6 covers f7, g7 and h7, so once the rook arrives on the 8th rank there's nothing left.
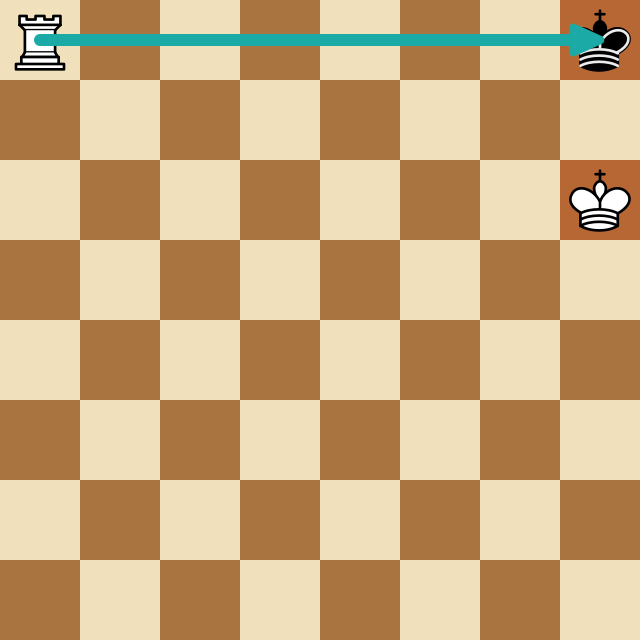
Look at how the two pieces divide the labour. The rook covers the entire 8th rank. The white king covers the three squares on the 7th that matter. Neither could do it alone, and that's the whole lesson of this endgame.
What do you do when you can't make progress?
You'll hit a position where the kings aren't in opposition, and any king move you make spoils something. This is what waiting moves are for.
Slide the rook along its cutting line, to any square that keeps the line intact. The position is unchanged except that it's now the defender's turn, and he has to commit his king somewhere. Usually he steps into opposition and you mate immediately.
Beginners tend to panic here and either check for the sake of it or abandon the cutting line to "do something." Both throw away progress. The waiting move is the whole answer, and it's the same tempo idea that runs through king and pawn endgames, where whoever is forced to move first is usually the one who loses ground.
How long the rook mate should take
Endgame tablebases put the maximum at sixteen moves with perfect play from the worst starting position, longer than the queen mate because the rook does so much less on its own. You can confirm that figure for any position you like on a public Syzygy tablebase browser, which reports the exact distance to mate.
Sixteen sits comfortably inside the 50-move rule, so there's no time trouble in the technical sense. But this mate does eat clock, and in a blitz game a player who has to work it out from first principles will burn a minute they didn't have. That's a real way to lose a won game, and it's entirely preventable.
Stalemate is less of a hazard here than in the queen mate, since a rook simply doesn't cover enough squares to trap a king by accident, but it's still possible when the enemy king is in a corner. The same pre-move question applies: does he still have a legal move?
Why this is the most useful basic mate to learn
Two reasons, and neither is about delivering mate.
First, it's the mate you most often reach in practice. Queen endings usually end earlier, because a player two pieces down resigns. Rook endgames grind on, and rook-versus-nothing is the natural end of a great many of them.
Second, and more importantly: this endgame teaches opposition, zugzwang and king activity in their purest form, with nothing else on the board to distract you. Those three ideas decide king-and-pawn endgames, which are the ones that actually determine results at club level. Learning the rook mate is a back door into all of it, one of the reasons basic mates sit so high on any sensible chess improvement plan.
How should you practise it?
Set a king and rook against a lone king on a board editor, place the defending king in the centre, and play it out against an engine that defends perfectly.
Three things to focus on:
- Count your moves. If you're taking over twenty, you're checking when you should be walking your king.
- Practise the waiting move deliberately. Reach a position where you can't improve your king, and find the rook shuffle that solves it.
- Try it from the other side. Defending with the lone king against an engine teaches you exactly which of your own moves make no progress.
Running these drills with live engine arrows makes the feedback immediate. With ChessSolve on the board you can see Stockfish's choice as you go, and in this endgame the engine's preference is almost always "improve the king" rather than "give a check," which is precisely the habit you're trying to build. Seeing that pattern a few dozen times teaches the principle better than any amount of reading.
Cut the king off, shrink his half of the board with your own king, take the opposition, check on the edge. Four steps, sixteen moves at worst, and a set of ideas (opposition, zugzwang, waiting moves) that will keep paying you back in every endgame you ever reach.
Next: the two-rook ladder mate, the one mate where your king can stay home. Or see all six in the basic checkmates guide.
Want to drill this with live engine arrows on the board? Download ChessSolve, free, works on Chess.com and Lichess.
Frequently Asked Questions
How do you checkmate with a king and rook?
Use the rook to cut the enemy king off from part of the board, then bring your own king up to face his. When the two kings stand opposite each other one square apart, the rook delivers check along the edge and it's mate. It takes at most sixteen moves with correct play.
What is the opposition in the rook checkmate?
The opposition means placing your king directly opposite the enemy king with exactly one square between them. It forces him to step aside, because he can't move toward you or stay put. In the rook mate it's the position you must reach before the final check works.
Why can't a rook checkmate on its own?
A lone rook can push the enemy king to the edge but can never mate him. On the edge the king still has escape squares along that edge, and the rook can only cover one line at a time. Your king is needed to take away the remaining squares.
What is a waiting move in the rook endgame?
A waiting move is a rook move along its cutting line that doesn't change anything except whose turn it is. You use it when the kings aren't yet in opposition, because it passes the move back to the defender and forces him to step into the position you want.
Analyze any game or position free
Paste a PGN or FEN into ChessSolve's free Stockfish analysis board and get best-move arrows and a live evaluation bar — no account needed.
Open the Analysis Board